Brake pads are the single most important wear item on your car. They are also the one most drivers ignore until metal grinds on metal, the pedal goes soft, or the car pulls dangerously to one side during a panic stop. I have replaced brake pads that were completely gone and heard the stories that came with them: close calls, near-accidents, and repair bills that tripled because the driver waited too long.
The question of how often to replace brake pads does not have one universal answer. It depends on how you drive, where you live, what you drive, and what the pads are made of. This guide covers every factor that affects brake pad life, how to inspect them yourself, the warning signs that demand immediate attention, and what happens when you push them past their limit.
What Brake Pads Actually Do
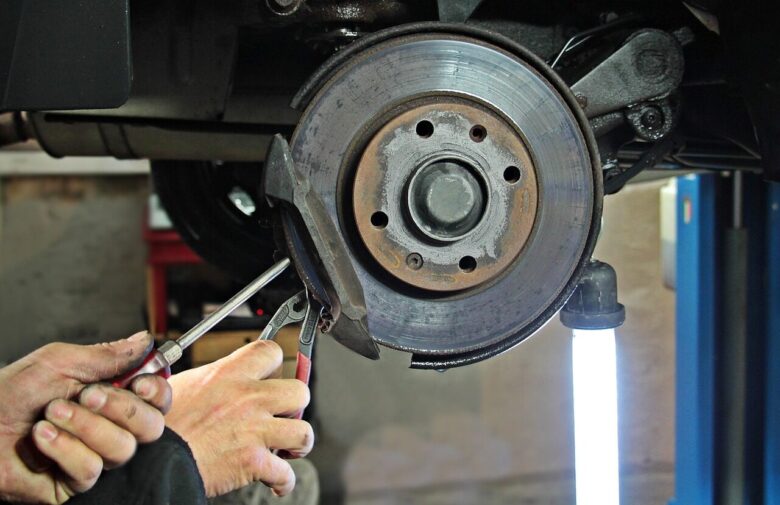
Brake pads are friction material bonded to a steel backing plate. When you press the brake pedal, hydraulic pressure squeezes the pads against the spinning brake rotors. The resulting friction converts kinetic energy into heat, slowing and eventually stopping the vehicle.
Every stop wears the friction material slightly. Over thousands of stops, the pad thins. When it reaches a minimum thickness, it must be replaced. If you wait until the friction material is gone, the steel backing plate contacts the rotor directly, destroying both components and creating a dangerous braking situation.
How Long Do Brake Pads Typically Last?
The industry rule of thumb is 25,000 to 70,000 miles, but that range is so wide it is almost useless without context. Here is what I see in practice:
| Driving Style and Conditions | Typical Pad Life |
|---|---|
| Highway commuting, gentle braking | 50,000–70,000 miles |
| Mixed city and highway, moderate braking | 35,000–50,000 miles |
| Stop-and-go city driving, aggressive braking | 20,000–35,000 miles |
| Mountain or hilly terrain, frequent downhill braking | 15,000–25,000 miles |
| Towing or heavy loads | 15,000–30,000 miles |
These are averages based on my experience in the shop. Your actual life may vary depending on vehicle weight, brake pad material, and driving habits.
Factors That Shorten Brake Pad Life
Driving Habits
The way you brake matters more than almost anything else:
- Late, hard braking: Converts high speed into heat rapidly, accelerating pad wear. It also warps rotors and stresses the hydraulic system.
- Riding the brake: Resting your foot on the pedal creates constant light friction, generating heat and wearing pads even when you are not actively stopping.
- Two-footed driving: Using one foot for gas and one for brake simultaneously is a guaranteed way to destroy brake pads and confuse other drivers.
- Downhill braking: Sustained braking on long descents overheats pads and can cause brake fade. Use lower gears to let the engine help control speed.
Vehicle Weight and Load
Heavier vehicles require more braking force to stop. A full-size SUV or truck wears pads faster than a compact sedan. Adding cargo, passengers, or towing a trailer increases the load and the braking demand.
Brake Pad Material
Not all brake pads are the same. The material affects wear rate, noise, dust, and performance:
- Organic (non-asbestos): Soft, quiet, inexpensive, but wear quickly. Common on economy cars.
- Semi-metallic: Harder, better heat dissipation, longer life, but noisier and more rotor wear. Common on trucks and performance vehicles.
- Ceramic: Quiet, low dust, moderate wear rate, good for daily drivers. Popular upgrade from organic pads.
- Low-metallic NAO: Good performance, moderate noise and dust. Common OEM choice for many vehicles.
Switching from organic to ceramic or semi-metallic pads can extend life, but may increase rotor wear or noise. Always use pads that match your driving needs and the manufacturer’s specifications.
Climate and Environment
- Stop-and-go traffic: Frequent braking accelerates wear dramatically
- Mountainous terrain: Downhill braking generates sustained heat
- Coastal or humid climates: Moisture and salt accelerate corrosion of backing plates and hardware
- Dusty or sandy environments: Abrasive particles embed in pads and accelerate rotor scoring
Warning Signs That Your Brake Pads Need Replacement
Your car communicates brake pad condition through sound, feel, and visual cues. Learn to recognize them before the situation becomes dangerous.
Audible Warning: The Squealer Tab
Most modern brake pads include a small metal tab called a wear indicator. When the friction material wears down to approximately 2 to 3 millimeters, this tab contacts the rotor and produces a high-pitched squeal.
This sound is intentional. It is designed to alert you that replacement is needed soon. If you hear squealing during light braking, schedule an inspection within the next few hundred miles. The squealer is telling you that the end of usable pad life is near.
Important: squealing can also occur from dust, moisture, or glazed pads. If the squeal disappears after a few stops, it may be temporary. Persistent squealing during normal driving is the warning sign.
Grinding Noise
A grinding or growling noise means the friction material is completely worn away and the steel backing plate is contacting the rotor directly. This is an emergency. Braking performance is severely compromised, and every stop damages the rotor.
If you hear grinding, stop driving and arrange for immediate repair. Continuing to drive risks brake failure and rotor destruction that turns a $150 pad replacement into a $500 pad and rotor job.
Pedal Feel Changes
- Soft or spongy pedal: Air in the brake lines, fluid leak, or failing master cylinder. Not a pad issue, but a critical safety problem.
- Long pedal travel: Pads may be worn thin, requiring more piston movement to contact the rotor.
- Pulsation or vibration: Warped rotors, often caused by overheating from worn or improperly bedded pads.
- Pedal sinks to the floor: Severe fluid leak or master cylinder failure. Stop driving immediately.
Pulling to One Side
If the car pulls left or right during braking, the brake system is not applying force evenly. Possible causes include:
- Uneven pad wear between left and right wheels
- Stuck caliper piston on one side
- Collapsed brake hose restricting fluid flow
- Contaminated brake fluid or air in one circuit
Pulling is dangerous because it reduces stopping control and can cause loss of directional stability during emergency braking.
Visual Inspection
You can inspect brake pads without removing the wheels on many vehicles:
- Look through the wheel spokes at the brake caliper and rotor
- Identify the outer brake pad visible at the edge of the rotor
- Estimate the remaining friction material thickness
Minimum safe thickness varies by manufacturer but is typically 2 to 3 millimeters. If the pad looks thinner than a quarter-inch, or if you can see the metal backing plate approaching the rotor surface, replacement is needed.
For a more accurate measurement, remove the wheel and inspect the pad directly. If you are not comfortable doing this, any tire shop or mechanic can check pad thickness in minutes, often for free.
Dashboard Warning Light
Some vehicles have electronic brake pad wear sensors that trigger a dashboard warning when pads reach minimum thickness. If your car has this feature, do not ignore the light. The sensor is telling you that replacement is due.
How to Inspect Your Brake Pads at Home
You do not need to be a mechanic to check your own brake pads. Here is the process I teach customers:
Tools Needed
- Flashlight
- Wheel chocks or blocks
- Jack and jack stands (if removing wheels)
- Tire iron or impact wrench
- Ruler or brake pad gauge
Step-by-Step Inspection
Step 1: Park on level ground and engage the parking brake. Chock the wheels opposite the side you are working on.
Step 2: Remove the wheel (optional but recommended for accurate measurement). Loosen lug nuts, jack up the car, secure with stands, and remove the wheel.
Step 3: Locate the brake caliper. It sits over the rotor and houses the brake pads. The outer pad is visible through the caliper opening.
Step 4: Measure the friction material. Use a ruler or gauge to measure the thickness of the pad material, not including the steel backing plate. Compare against the manufacturer’s minimum specification, usually found in the service manual or online.
Step 5: Check the rotor surface. Look for deep grooves, scoring, cracks, or discoloration from overheating. A smooth, even surface with light wear lines is normal.
Step 6: Inspect the caliper and hardware. Look for leaking brake fluid, corroded slide pins, and damaged dust boots. These affect pad wear and braking performance.
Step 7: Repeat on all four wheels. Brake wear is often uneven between front and rear, and sometimes between left and right.
How Often to Inspect
- Every oil change: Quick visual check through the wheel spokes
- Every 10,000 to 15,000 miles: Thorough inspection with wheels removed
- Immediately: If you notice any warning signs — noise, vibration, pulling, or soft pedal
- Before long trips: Brakes are your most critical safety system for highway driving
What Happens If You Wait Too Long
Delaying brake pad replacement does not save money. It creates a cascade of expensive problems:
Rotor Damage
When the steel backing plate contacts the rotor, it gouges and scores the metal surface. Minor scoring can sometimes be machined smooth. Deep scoring or warping requires rotor replacement, adding $200 to $400 per axle to the repair bill.
Caliper Damage
Overextended caliper pistons can seize or leak. A seized caliper drags the brake constantly, overheating the system, destroying the new pad, and potentially causing brake fade or fire. Caliper replacement adds $150 to $300 per wheel.
Brake Fluid Contamination
Overheated brakes boil the brake fluid, creating air bubbles that compress instead of transmitting hydraulic pressure. The result is a soft pedal and reduced stopping power. A complete brake fluid flush is needed, adding $100 to $150.
ABS and Stability Control Issues
On modern vehicles with electronic brake systems, uneven braking or damaged sensors can trigger warning lights and disable safety features. Diagnosing and repairing these systems is complex and expensive.
Safety Consequences
The most serious cost of worn brake pads is not financial. It is the accident that happens when you cannot stop in time. Worn pads increase stopping distances, reduce control during emergency braking, and can fail completely if overheated.
I have seen the aftermath of brake failures in the shop. They are not statistics. They are real people with damaged cars, injuries, and regrets about waiting one more week.
How to Extend Brake Pad Life
While all pads eventually wear out, you can maximize their life with these habits:
- Anticipate stops: Coast early and brake gently rather than waiting until the last second
- Avoid hard braking: Unless it is an emergency, gradual deceleration wears pads less
- Use engine braking on hills: Downshift to let the engine control speed instead of riding the brakes
- Remove excess weight: Extra cargo increases braking demand
- Keep the brake system clean: Road salt and grime accelerate corrosion of hardware
- Flush brake fluid every 2 to 3 years: Contaminated fluid causes caliper corrosion and uneven wear
- Bed new pads properly: Follow manufacturer break-in procedures after replacement to ensure even wear
When to Replace Rotors With Pads
Brake pads and rotors work as a system. Replacing pads without addressing rotor condition can cause noise, vibration, and premature pad wear.
Replace rotors when:
- They are worn below the manufacturer’s minimum thickness specification
- They are warped, causing pedal pulsation
- They are deeply scored or cracked
- They have been machined before and lack sufficient thickness for another resurface
- The vehicle has high mileage and the rotors have never been replaced
Some shops automatically resurface or replace rotors with every pad change. Others inspect and only replace if needed. Ask for a measurement and explanation rather than accepting a blanket recommendation.
DIY vs. Professional Replacement
DIY Brake Pad Replacement
Replacing brake pads is one of the most accessible DIY repairs for home mechanics. Basic tools, a jack, and jack stands are sufficient for most vehicles. The process involves removing the wheel, compressing the caliper piston, removing the old pads, installing new ones, and reassembling.
Cost savings are significant. DIY pad replacement on most cars costs $50 to $150 in parts versus $250 to $400 at a shop.
However, DIY is not for everyone. You need:
- A safe place to work with level ground
- Proper tools and torque specifications
- Confidence working on a safety-critical system
- Knowledge of your specific vehicle’s brake system
If you are unsure, hire a professional. Brakes are not the system to learn on if you are not already comfortable with basic mechanics.
Professional Replacement
A professional shop provides:
- Proper inspection of the entire brake system, not just pads
- Measurement of rotor thickness and runout
- Caliper slide pin lubrication and hardware replacement
- Brake fluid testing and top-off
- Warranty on parts and labor
- Peace of mind that the job was done correctly
For most drivers, the extra cost of professional service is worth the safety assurance and comprehensive inspection.
Bottom Line
Brake pads are a wear item, not a failure item. They are designed to be replaced. The question is not whether you will replace them, but whether you will replace them on your schedule or on the emergency schedule that comes with grinding metal and compromised safety.
Inspect your pads every 10,000 to 15,000 miles. Listen for squealing. Feel for changes in pedal behavior. Watch for pulling or vibration. And when the warning signs appear, act promptly. A $150 pad replacement is always cheaper and safer than the alternatives that follow procrastination.
Your brakes are the only thing between your car and whatever is in front of it. Treat them with the respect they deserve.
Related Reading
Keeping your car well-maintained reduces the likelihood of expensive repairs across all systems. Learn how to extend your vehicle’s life in our guide: How to Make Your Car Last Longer Without Spending Too Much on Repairs.
Disclaimer: This article is for informational purposes only. Brake systems are safety-critical. Always consult a certified mechanic if you are unsure about your brake condition or repair procedures. Oriola Car Insights is not responsible for injury or damage resulting from brake work performed based on this content.

The Oriola Cars Editorial Team creates and reviews practical automotive content about vehicle ownership, maintenance, used-car buying, safety, insurance and everyday driving costs.